10.31.2011

maui here we come!

Tomorrow morning, at the crack of dawn, we will be waking up two peacefully sleeping boys and taking them to the airport.


We are running away to Maui...  for a well-earned vacation, and to find the sun!

After one of the worst summer's for weather that we have ever had in the Pacific Northwest...  we need this warmth and sun more than you would believe.

Seriously...  I am cold to the center of my bones.

Now, don't get me wrong...  I am still loving this beautiful cold fall weather and looking forward to my favorite season:  Winter!  (Hello!  Christmas!!!)  

But...  we had better get a good snow-full winter to make up for it, is all I have to say.

Anyways, while we are off enjoying our sun and family time, I will be posting as much as possible.

Probably not everyday, and definitely not many (if any) recipes, but lots of little snippets and ramblings so you can enjoy our trip with us, if you'd like.

Goodness though...  I wish you could all come with us!  How fun would that be?!


10.30.2011

for your viewing pleasure...

Cuteness beyond belief...


A girl, her dog... and a pumpkin.


You're welcome.  


10.29.2011

[a trick] for thickening soups...

I've mentioned this before (in my Cheddar Fondue Soup recipe) but I thought this trick needed its own post for clarification.

My secret for thickening soups (and we like most of our soups thick around here!)...

is Instant Mashed Potatoes!


I buy a big box of these Honest Earth* natural instant mashed potato packets at Costco, and use about 1/4-1/2 of a packet for each batch of soup, depending on how much there is or how thick we want it.

Some soups, like Split Pea & Ham, turn out nice and thick the second day when you reheat them, but sometimes not so thick the first day.

To solve this problem, I sprinkle in a bit of instant mashed potatoes and instantly we've got perfect soup!

*Disclaimer:  This is not a sponsored post.  Honest Earth doesn't know anything about me...  I just love their product because #1: it is natural - potatoes, butter and salt, nothing more... and #2: I can buy it at Costco!  

10.28.2011

apple crisp yogurt parfaits

After making my vanilla chai spiced granola the other day, I couldn't stop thinking about making some yummy fall treats with it.


The beautiful fragrant spices in the granola remind me so much of apple crisp that I decided to combine them into breakfast.

(Not that I don't just eat apple crisp for breakfast if I have it...  because I do!)


This parfait is perfect with homemade applesauce...  but you can also use finely chopped fresh apples tossed with brown sugar if you don't have any applesauce on hand!

Apple Crisp Yogurt Parfaits

Ingredients:
1/4 cup homemade chunky apple sauce
1/8 teaspoon cinnamon
1/2 cup plain or vanilla yogurt
1/2 cup chai-spiced granola

Directions:
Layer the ingredients in order in a small dish.

This makes one serving.  Adjust accordingly!

10.27.2011

vanilla chai-spiced granola

All the wonderful flavors of chai spice in a comforting granola form...  absolutely perfect sprinkled over a bowl of yogurt, or snacked on by the handful!


I finally recovered enough from the great pumpkin granola debacle of last month to attempt to make some more.

I was not, however, ready to attempt another pumpkin granola yet.  Bad memories and all...

So I switched from pumpkin to one of my other favorite fall treats.  Chai!

And boy am I glad I did!!  This simple cardamom-vanilla chai granola is perfect for this cold fall weather we're having!


Vanilla Chai-Spiced Granola Recipe
adapted from Together Table and Bon Appétit

Ingredients:
5 cups old-fashioned rolled oats
1/2 cup firmly packed brown sugar
1/2 teaspoon salt
1 tablespoon cardamom
1 teaspoon cinnamon
1/2 teaspoon ground ginger
1/2 teaspoon freshly ground black pepper
pinch of ground cloves
1/3 cup vegetable oil
1/4 cup honey
3 tablespoons sugar 
1 tablespoon pure vanilla extract

Directions:
Preheat the oven to 300ºF.  Line a rimmed baking sheet with foil and lightly spray or grease the foil.

In a large bowl, stir together the oats, brown sugar, salt & spices.  

In a small saucepan combine the oil, honey & sugar and heat over medium heat, stirring often, until melted and smooth.

Pour the warm honey mixture over the oats mixture and combine well, using your hands to really get every bit of oats coated.  

Spread the mixture out on the greased baking sheet and bake for 45 minutes to 1 hour, stirring every 10 minutes for loose granola and every 20 minutes for bigger clumps, until the granola is golden brown and dry.

Cool completely and then store in tupperware in the cupboard for up to 2 weeks if it lasts that long!


10.26.2011

baked cheesy chicken fettuccine alfredo

Ok, ok...  so I know I didn't actually use fettuccine noodles in this, but...  if you have little kids, you probably understand my desire to use short noodles in my cooking!

Regardless, I still call this dish fettuccine alfredo, because penne alfredo just doesn't sound right.  Whatever you call it...  it's delicious!


Creamy, cheesy, gooey, rich, satisfying...  so not good for you.

I'm not telling you to make this every night...  just give it a try for a special treat.  And yes, it is absolutely worth the splurge!!


This is a great meal to make ahead.  Just finish the recipe up until placing it in the oven and cover it and put it in the fridge instead!  You will need to bake it a bit longer to heat it up before serving.

Baked Cheesy Chicken Fettuccine Alfredo

Ingredients:
3/4 pound (or so) noodles (penne works great!)
1/2 cup butter, divided (3 tablespoons + the rest)
2 cloves garlic, minced
2-3 chicken breasts, cut into bite-sized-ish strips
1/4 cup flour
salt & pepper, to taste
crushed red pepper flakes, to taste (optional)
1 cup heavy cream
1 cup (or so) reserved pasta water*
1 1/2 cups freshly grated parmesan cheese
3/4 cup shredded mozzarella

Directions:
Preheat the oven to 350ºF.  Butter a 9x13" baking dish.

Cook the noodles according to the package directions.  (I usually cook the whole pound and then dish up a bowl-full for my toddler and I to snack on while I cook!)  Reserve 1 cup of the pasta water before draining and then set the noodles aside.

Meanwhile, in a large skillet, melt 3 tablespoons of butter over medium-high heat.  Add the garlic and chicken - seasoning with salt & pepper, and red pepper flakes if you'd like - and cook until the chicken is no longer pink in the middle.

Add the rest of the butter and stir and let melt.  Sprinkle the flour evenly over the chicken and cook, stirring, until the flour has absorbed most of the butter and has turn lightly golden brown.

Turn off the heat and stir in the heavy cream and 1/2 cup of the pasta water.  Dump in the cooked noodles and the cheeses and stir until melted, adding in up to an additional 1/2 cup pasta water if needed.

Pour everything into the greased baking dish and bake for 20-30 minutes, until the sauce is bubbly.  If you'd like the top a little more golden, feel free to put it under the broiler for a few minutes!

Serve with lots of crusty garlic bread and wine!

10.25.2011

little stars with peas & parmesan [new favorites challenge]

This is a very simple recipe, but sometimes - especially in a house full of kiddos - simple is just what we need.


(My boys loved this meal, especially Haakon... who just couldn't seem to get enough!)


For this week's New Favorite Challenge cookbook (we're on week 6, if you're keeping track!), I chose "Everyday Pasta" by Giada DeLaurentiis.

I love Giada.  Back when I had access to the Food Network, I watched her all the time.  I own most of her cookbooks, and I have even met her in person!

(She is absolutely adorable, by the way...  as if you didn't know that already!)


These adorable little star-shaped noodles are called Stelline, and they are perfect for little eaters...  especially little eaters that love Dora as much as mine does!


I added peas because Haakon loves them.  Bjørn, of course, wouldn't touch his bowl with a 10-foot pole.

He's picky.  There were lots of tears.


And no, he didn't get a bowl without peas.  He may be stubborn, but I'm pretty sure I'm more stubborn!

Little Stars with Peas & Parmesan Recipe
adapted from Everyday Pasta

Ingredients:
1 cup (6oz) stelline (star-shaped pasta) or other small pasta
1 cup frozen peas, defrosted
4 tablespoons freshly grated parmesan cheese
2 tablespoons butter, softened
salt, to taste

Directions:
Cook the pasta according to package directions.  Just before draining, stir in the peas and let them warm up for a few seconds.  Drain well.

Return the pasta & peas to the now-empty pot and toss in 2 tablespoons of the parmesan cheese.  Stir to coat and melt the cheese.

Add the butter and remaining parmesan cheese, stirring again to coat.  Add salt to taste and serve!

10.24.2011

fresh cranberry sauce

I don't know about you, but Thanksgiving seemed like it was a long ways off... until I looked at the calendar and realized it's only one month away!

Do you have your plans all set for Thanksgiving? If you are hosting, do you have your menu laid out already?

I don't... but I do know that this cranberry sauce will be on my Thanksgiving table this year and every year, that's for sure!

This is a very old, not-so-great photo.  
As soon as I can eat citrus again, I will make this sauce and take a new picture! 

I have such great memories of spending Thanksgiving with my Minnesota family, and this dish especially brings them all back.  (Isn't it amazing how tastes and smells can do that to us?!)

For me, Thanksgiving just isn't the same without it!

What are your Thanksgiving table Must Have's??  

(Besides the turkey, that is!)

Kay's Fresh Cranberry Sauce Recipe

Ingredients:
1 bag raw cranberries
4 large granny smith apples, cored and quartered
1 orange, zested and peeled
3/4 - 1 cup of sugar, to taste

Directions:
In your food processor, using the shredder attachment, shred the apples, orange and cranberries.   Dump the fruit into a separate bowl.

Switch out to the regular food processor blade, dump all the shredded fruit back in, add the sugar and zest and process until very fine.

Store in the fridge until you're ready to use!  (This tastes better if it gets to sit for a day or so!)


My cousin, Kay, makes this recipe using an old-fashioned meat grinder, but since I don't have one of those - I had to adapt it to my food processor, and I think it turned out great!!

I could eat the whole batch straight out of the food processor, and so could my kids... it's SO good!

Come join the fun at the My Baking Addiction and GoodLife Eats Holiday Recipe Exchange sponsored by OXO!

10.23.2011

slow cooker cheddar fondue soup

This cheesy fondue soup is a beautiful, rich, creamy fall treat.  Lots and lots of cheesy goodness with the tang of a good full-bodied beer (I used an Alaskan Amber for this one!) and a smoky hint of spice. 

It really does taste like a big bowl of fondue.  Yum!


I am beyond obsessed with soups lately...  I know I've used that word quite a bit recently, so if you're keeping track:  Soup + eggnog + pumpkin = my current obsessions.

There's just something about soup when it's cold out.  It's so comforting.  Every part of it!

The mouthwatering smells as it simmers away all day long...

The rich soothing taste as you slurp it up with lots of fresh bread...

The fact that it tastes even better the next day when you heat up some leftovers!

Seriously...  how does it get much better than that??


This soup really, really, really tastes better after it has had a day to sit and meld in the fridge.

So much so that if you are making this for company, I would suggest you make it ahead and just reheat it.  You will be amazed at how great it tastes after sitting a day or two!

Please don't be scared of the instant mashed potatoes.  They are a great secret-ingredient for thickening soups quickly...  and if you check the packages, you can find brands with no weird ingredients...  just potatoes & salt!

(Oh, I added a bit of chicken to the soup... because we just love meat.  And a little protein never hurts!  But it's definitely not necessary, so feel free to leave out the chicken if you want!)

Slow Cooker Cheddar Fondue Soup Recipe
adapted from The Gourmet Slow Cooker Vol II

Ingredients:
2 tablespoons butter
1 large onion, chopped
2 cloves garlic, minced
2 celery stalks, thinly chopped
2 medium russet potatoes, cut into 1" chunks
(1 chicken breast, optional)
1 cup full-bodied beer
6 cups chicken stock
1/2-1 teaspoon chipotle chili powder
1/2 teaspoon dry mustard
1 tablespoon Worcestershire sauce
3 cups shredded Tillamook medium or sharp cheddar cheese
1/4 cup, or so, instant mashed potatoes
salt & pepper, to taste

Directions:
In a skillet, sauté the onions is butter over medium-high heat until they are just brown.  Stir in the garlic for a few seconds and then dump it all into the crockpot.  (Alternately you can put the onions and melted butter into the crockpot on HIGH for one hour and then add the garlic and continue with the recipe below.)

Dump in the celery, potatoes, beer, stock & spices and stir.  Cover and cook on LOW for 6-8 hours, until the veggies are tender and the chicken is cooked through.

Take out the chicken breast and shred it or chop it up and set aside.  With a potato masher, mash up the potato chunks in the soup, until it is creamy, but still a bit chunky.  Add the chicken back in.

Add the cheese into the crockpot and cook on low, stirring occasionally, until melted.  If the soup is not as thick as you'd like (we like our soups thick!) slowly sprinkle in instant mashed potatoes until it has reached the consistency you'd like and season wit salt & pepper to taste

Serve with lots of bread, apples & veggies to dip in it!

10.22.2011

white chocolate cranberry pistachio bark

Homemade Peppermint Bark is a holiday-season staple in our house.

Back in the day it was from Costco or even better - Williams-Sonoma...  Until one day I realized how ridiculously easy it would be to make at home and we haven't gone back to store-bought since!

But... since it's a teeny-bit early for peppermint bark around here (although I do realize how silly that sounds, since I have been enjoying my eggnog treats for a few weeks now!), I decided to make something a bit more fall-ish to satisfy my bark-craving!


White chocolate, of course, because the Hubs loves white chocolate.

Dried cranberries & orange zest, because I love those...

And roasted pistachios because...  well, because I had some in my cupboard and it sounded like a good combo!

All-in-all, I'd say this one is a winner!  Definitely pretty and a fun treat to serve guests...  this will for sure be on our Thanksgiving table this year!

White Chocolate Cranberry Orange Pistachio Bark Recipe
adapted from brown eyed baker

Ingredients:
3 cups good-quality white chocolate chips
1 tablespoon orange zest
1/2 cup dried cranberries
1/4 cup pistachios (shells off, of course!)

Directions:
Melt the white chocolate chips in the microwave, stirring well every 30 seconds, until smooth.

Stir in the zest, and pour out onto a foil-lined baking sheet, spreading to about 1/4" thick.

Sprinkle evenly with cranberries, cherries - if using & pistachios and refrigerate for a few hours until completely firm.

Peel off the foil and break into chunks.  Store in Tupperware in the fridge!

10.21.2011

salted butter caramel sauce

oh. my. yum.  Really...  is there anything more I need to say than that?


I can't get enough of this caramel.  I dipped apple slices in it...  I dipped a spoon in it...  I dipped my fingers in it...  And it was good!


I really didn't alter this recipe except for a tiny pinch more salt...  Deb really hit the nail on the head with this one and I am so glad she did!


I made a few jars to go in some auction baskets I am donating, and will most likely make some more for Christmas gifts...  Yum!

Salted Butter Caramel Sauce Recipe
adapted from Smitten Kitchen

Ingredients:
1 cup sugar
6 tablespoons butter, diced
1/2 cup + 2 tablespoons heavy cream, at room temperature
pinch of salt

Directions:
Melt the sugar over medium to moderately high heat in at least a two or three quart sized pot or larger, gently whisking or stirring the sugar as it melts to ensure it heats evenly.

Cook the liquefied sugar to a nice, dark copper color. 

Add the butter all at once and stir it in, before turning off the stove and pouring in the heavy cream, whisking it until you get a smooth sauce.

Use it right away or pour it into a jar and store it in the fridge for up to two weeks. 

When you take it out, it will likely have thickened a bit but 60 seconds in the microwave brings it right back to pouring consistency.

10.20.2011

we're going on a trip!!

Yep, it's true...  2 weeks from now, I will be sitting on the beach in Maui hanging out with some of my favorite people!


To say I am excited is an understatement...  This trip is much needed in this crazy busy season of our lives.  I am counting down the days, hours and minutes... I am so excited!

I am more than a bit nervous for the traveling part though.  Thankfully we were able to get direct flights this time...  transferring planes with 2 kiddos, luggage, car seats, etc?  Scary!!

Do you have any tips for me??  Tricks?  Advice?  Warnings???

Besides bringing the grandparents that is...  we've got that part covered.  ;o)

I have flown with Bjørn as a baby a few times, but never with 2 kiddos... and never with a toddler!

(Thank goodness for family coming along.  I'm sure I wouldn't survive this without them.)

Oh and in case you were wondering...  last time we went to Hawaii, we had a cute little 7-month-old Bjørn along.  And he was that baby.  He screamed.  The whole. flight. home.  :o(  Torture...  for me and everyone else on that poor flight!

Now you understand my fears, yes?

I can't wait to hear your tips!!  Bring 'em on friends!

10.19.2011

triple-chocolate peppermint hot cocoa mix

These cute & easy jars of triple-chocolate peppermint hot cocoa mix mark the beginning of my Homemade Christmas Gift testing & making for the season!


Actually, I guess I started it a while ago when I made my Homemade Vanilla Extract...  but that was just an early start thing.  Now the fun really starts!


I have so many fun ideas for this year's Christmas gifts!  Some are projects for Navy and I to work on together...  and the rest are projects for just me.

(Little tidbit about me:  I'm not so good with help in the kitchen... something I am working on and need to be better about, especially with kiddos who want to help...  but it's so hard!)

This is by far one of the most fun and easiest gifts to make and would be a great kiddo-helper task!


Andes Peppermint Crunch Baking Chips are available mostly at the holidays I think...  I love them, so I stock up when I can find them so I can use them all year long.  


Especially in my Chocolate Peppermint Candy Cookies...  my favorite cookies ever!

(Oh...  each jar makes about 6 servings.  Unless you want a huge mug or multiple servings.  :o)  I am about to go make another mug-full...  as soon as I get done writing down this recipe for you!)

You can double this recipe to put in one quart-sized jar if you want a bigger batch!

Layered Triple-Chocolate Peppermint Hot Cocoa Mix Recipe
adapted from my recipes
recipe makes 1 pint-sized jar

Ingredients:
1/2 cup powdered milk
1/2 cup unsweetened cocoa powder
1/2 cup sugar
1/4 teaspoon salt
1/4 cup mini chocolate chips
1/4 cup andes peppermint candy baking bits or
     3 tablespoons crushed candy canes
     1 tablespoon chopped white chocolate
1/4 cup mini marshmallows

Directions:
Layer the ingredients, in the order shown, in a pint-sized jar... using just enough marshmallows to fill up the jar so the contents don't move around too much when sealed.

Include these directions on a cute little tag or label when giving these as a gift:

"Mix contents well in a large bowl.  For each serving, place 1/3 cup cocoa mix in a mug.  Add 8oz of boiling water, stir well."

10.18.2011

spiced apple pancakes [New Favorites challenge, week 5]


Does anyone else have a new-found aversion to the Joy of Cooking books because of Julie & Julia?

Or is it just me??

I guess I should do some research on the truth of that matter, but it really bugged me when Irma Rombauer's character in the movie said that she didn't test all of her recipes.

ARGH!  Recipes must be tested!  How can someone just make something up out of thin air and not try it to see if it works before sharing it with the world?!

Well, I have some of these Joy of Cooking books (from the "All About..." series) and after ignoring them and glaring at them on the bookshelf for months now, I decided to give one of them a try.

That's the real point of this challenge, isn't it?  To take myself out of my comfort zone and try things I normally wouldn't?

Ok then.  Our weekend-mornings chef (a.k.a. the husband) decided he wanted to make some spiced apple pancakes for breakfast.  So, I went to my bookshelf and grabbed this book:


I found the pancakes section and we decided to use the Blueberry Buttermilk Pancakes recipe as our starting point.  Lots of changes made, but it was a good starting point and I might even use this cookbook again!


Spiced Apple Pancakes Recipe
adapted from All About Breakfast & Brunch

Ingredients:
2 tablespoons butter
1 large apple (or 2 mediums ones!), finely chopped
2 tablespoons brown sugar
2 teaspoons cinnamon, divided (1 teaspoon + 1 teaspoon)
1 1/2 cups flour
1/4 cup sugar
1 1/4 teaspoon baking powder
1 teaspoon cinnamon
1/2 teaspoon nutmeg
1/4 teaspoon baking soda
1/4 teaspoon salt
1 1/4 cups buttermilk
4 tablespoons butter, melted
2 large eggs, separated (2 yolks + 2 whites)
caramel sauce

Directions:
Heat 2 tablespoons of the butter over medium heat in a skillet.  Dump in the apples, brown sugar & 1 teaspoon of the cinnamon, and sauté until soft.  Set aside.

In a large bowl, whisk together the flour, sugar, baking powder, remaining 1 teaspoon cinnamon, nutmeg, baking soda & salt.

In a small bowl, whisk together the buttermilk, 4 tablespoons melted butter & the egg yolks.

Dump the wet ingredients into the dry ingredients and whisk them gently together until just combined (lumps are ok!).

In a separate mixing bowl, beat the egg whites on medium speed until stiff, but not dry.  Gently fold the egg whites (in 2 batches) into the batter.

With a slotted spoon, scoop the sauteed apples out of their sauce and gently fold them into the batter.  Reserve the sauce for drizzling!

Cook the pancakes as you normally would.  Serve with the leftover apple caramel sauce, more caramel sauce if desired, maple syrup, cinnamon & sugar or whipped cream!

10.17.2011

slow cooker eggnog steel-cut oatmeal

As I sat there sipping my eggnog-laced coffee the other day, I couldn't help but think about all the other ways I could possibly enjoy one of my favorite parts of the holiday season*.

I love the holidays so so much.  Every tiny little thing about them!  Of course, I especially look forward to the food...  and the eggnog!

Eggnog latte's, and eggnog-latte sugar cookies...  eggnog-frosted nutmeg cookie logs and eggnog and coffee ice creams eaten at the same time...

So, I decided to take my favorite Slow Cooker Steel-Cut Oatmeal recipe and turned it into Eggnog Oatmeal for the holidays!  Oh My Yum!!!  What a perfect breakfast!


Besides just loving the ease of this recipe (and how great it tastes!) I just can't help but love how amazing it makes my house smell.

For a perfect morning, I set my coffee maker to automatic, throw some oatmeal together in the crockpot and get to wake up to sheer joy.

I have a feeling I will be making this breakfast a lot this winter...  all the way through until the stores stop carrying eggnog!

Slow-Cooker Eggnog Steel-Cut Oatmeal Recipe

Ingredients:
1 1/2 cups steel-cut oats
5 cups water
2 cups eggnog
1/2 teaspoon salt
1 teaspoons pure vanilla extract
2 teaspoons nutmeg
2 tablespoons butter

Directions:
Stir everything together in your slow cooker. Turn on low and cook for 8 or so hours (while you sleep!).

When it's done in the morning, it will still look a bit funny but give it a good stir and it will all come together perfectly!

Serve with a bit of brown sugar if you like your oatmeal on the sweeter side, and more eggnog drizzled on top with a pinch of fresh ground nutmeg.

You can store any leftovers in the fridge to heat up later!  (This amount makes enough for 4-5 big bowls of oatmeal.)

*West Bend sponsored this week's "Crockpot Recipes" theme for the Holiday Recipe Exchange over at GoodLife Eats and My Baking Addiction!

10.16.2011

eggnog latte sugar cookies

These nutmeg-laced sugar cookies with a creamy coffee-spiked eggnog frosting have all the goodness of an eggnog latte in cookie form!


This is a variation on a lovely Pink Sugar Cookies recipe that I got years ago from a sweet friend.  This friend, Linda, is known for her big wonderful family and her fabulous baked goods!

I turned these into eggnog latte cookies for the holidays...  and because I just adore eggnog and can't seem to get enough of it!

If you love eggnog like I do, then you will enjoy these cookies!

(And if you don't like coffee, feel free to leave out the coffee liqueur and just have eggnog cookies!)

Eggnog Latte Sugar Cookies Recipe

Ingredients:
for the cookies:
1 1/2 cups butter, softened
1/2 cup vegetable oil
1 cup sugar
1 cup powdered sugar
2 large eggs
1 teaspoon pure vanilla extract
5 cups flour
1 teaspoon baking soda
1 teaspoon cream of tarter
1 teaspoon ground nutmeg
1/2 teaspoon salt
for the frosting:
4 tablespoons butter, softened
1/4 cup eggnog
1 tablespoon Starbucks coffee liqueur
4 cups (or so) powdered sugar
nutmeg, for sprinkling

Directions:
In a large mixing bowl, cream together the butter, oil and sugars until light and smooth.  Beat in the eggs and vanilla until well mixed.  In a large bowl, whisk together the flour, baking soda, salt, cream of tarter and nutmeg.  Stir the dry ingredients into the wet ingredients until combined.

Divide the dough into 4 portions and roll each one into a log about 2" thick.  Wrap each log in plastic wrap and place them in the freezer for at least a few hours.

When you are ready to bake them, preheat the oven to 325ºF.  Take out a roll of dough and slice it into about 1/2" slices.  Place the slices on a parchment-lined baking sheet and bake for about 12 minutes, until they are just set (no longer shiny-looking).  Let them cool completely on the baking sheet before frosting.

For the frosting:  Beat together butter, eggnog & coffee liqueur until smooth.  Mix in powdered sugar, 1 cup or so at a time, until you reach your desired consistency.  Spread on the cooled cookies and sprinkle with ground nutmeg.

10.15.2011

I don't wanna...

I really really don't wanna!

Potty train my toddler, that is.  

I am so incredibly, completely, wholly dreading this experience.

I know that everyone has done it and survived, but I just don't know how I will.

If you know me In Real Life, you probably know already that I don't like messes.

If you didn't already know that, well...  now you do.  (And you obviously have never lived with me.  Those who do or have, are well aware of my ick-phobia!)

I just don't know how I am going to handle all the messes.  Ugh.  I think I'd rather just leave him in diapers until he's ready for Kindergarten!

But, I also know that I can't put it off much longer.  Bjørn is ready.

Whether he likes it or not.

He gets upset now when he fills his diaper.  He wants it off and says "ewww....  YUCK!".

Of course, when asked if he wants to go use the big boy potty, he says "Nope.  Born car-mater-wakeeen diaper?"  

(Toddler-speak translation:  "Car-mater-wakeeen" is Lightning McQueen from CARS...  which is on his pull-ups.)

He is as stubborn as all get-out.  Maybe even more stubborn than me.

So I can tell you already...  this is not going to be fun for either of us!  But it's time.

So, tell me...  What worked for you??

I have looked into (and heard great things about) the 3-day Potty Training Method...  but I must admit, it kinda scares me!

Other than that, I am a fish out of water here.

We have one of these, that he loves to sit on, but not use:


And we have one of these, that we both hate:


So, please...  tell me what worked for you!

Encourage me!  Give me your advice!!  (Yes, I'm asking for it!)  Help!

Because at this point...

I just don't wanna do it!

10.14.2011

a BeaterBlade review & giveaway!

There really is a product that not only eliminates the need to stop and scrape down the bowl while mixing, but also cuts down over all mixing time?!  Genius!


Earlier this week I received one of these amazing inventions - the BeaterBlade - to review.  Can I just tell you, I don't think I have ever been so excited to get something in the mail?

(If you use your stand mixer a lot, and have heard about the BeaterBlade...  you probably understand that excitement!) 

I have already used it several times since, and oh my goodness am I a BeaterBlade convert!  It really does mix things so much more quickly and efficiently...  and makes me want to use my stand mixer even more than I already do!

I made a double-batch of banana bread and it was all perfectly mixed in about 2 minutes total!  With NO stopping and scraping!!


From the company's website: "BeaterBlade® and BeaterBlade Pro continuously beats, scrapes and folds ingredients for KitchenAid®, Cuisinart™, Viking®, and Kenwood® stand mixers, making BeaterBlade one of the most efficient tools in today's kitchen.  It virtually eliminates hand-scraping the bowl and batter build-up on the blades.  Ingredients are thoroughly incorporated ensuring foolproof mixing and baking preparation.  BeaterBlade and BeaterBlade Pro cuts mixing time by up to 50% and minimizes batter build-up on the beater and blade.  Both models are Made in the USA and UL Certified to ANSI/NSF2 Commercial Standards.  Patented BeaterBlade "wing-system" design acts like a wiper blade that continuously scrapes the sides and bottom of bowl while it mixes.  Oh, and BeaterBlade is also a Spatula!"

Want to try one for yourself??  Well, you can of course go buy one...  but why not try to win one first?

NewMetro Design has graciously offered to giveaway a BeaterBlade to one of my readers!

[And yes, this giveaway is also open to all of my lovely Canadian readers!!]

To enter:

(1) go "like" both BeaterBlade's and Sweet Anna's facebook pages and come back here and comment that you did.*

That one is mandatory.

For up to 2 additional entries:

(1) follow both BeaterBlade and me on twitter and come back here and comment that you did!

(1) share this post on Facebook or on Twitter and come back here and comment that you did (please include a tag to @sweetannas.com on facebook... or #annaliseree on twitter!).

That's a total of 3 entries if you want 'em!  Let me tell you (as if I haven't already!)...  you are going to LOVE this product!  (Especially in time for all the holiday baking ahead of us!)

The Fine Print:  This giveaway will end on Tuesday, October 18th at 11:59pm PST.  The winner will be announced on Sweet Anna's facebook page and contacted by email if possible.  The winner will then be able to choose which BeaterBlade model they need and it will be sent directly from the manufacturer.  This giveaway is open to all of my US and Canadian readers!   


(*If you do NOT use facebook at all, then you may enter this giveaway by becoming a blog follower - over on the right hand side - and letting me know that you did, and that you don't have FB!)

UPDATE:  Giveaway is now closed!  And the winner is...  comment #12...  Jessica!


Congratulations and happy baking!!

10.13.2011

I was that girl...

the one who thought she had all the answers.

the one who said "if she would do this..." or "if he would just not do that..."

the one who was happy to throw out advice.

the one who could always calm a fussy baby and even get him to sleep.

the one who was never going to let her babies sleep in her bed at night.

the one who judged.

the one who thought she was right.

the one who knew it would be easy.

And then...

I became this mom.

The one who knows she doesn't have any of the answers.

The one who cringes at "if only's" and understands that there are no perfect rules.

The one who has little advice, except to trust your mommy-heart instincts.

The one who can't even calm her own fussy babies without popping a boob in their mouths!

The one who has a baby sleeping with her almost every night.

The one who is no longer quick to judge.

The one who knows she's probably not right about much of anything.

The one who knows it's never easy being a mom...


But boy is it worth it!


10.12.2011

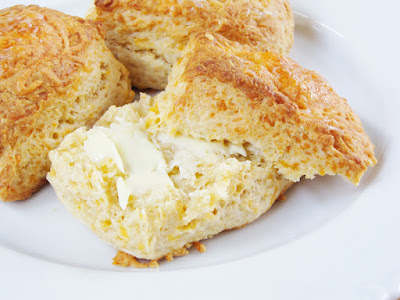
quick & easy garlic cheese biscuits

I made these biscuits to go with my Buffalo Chicken Corn Chowder the other day, and they were the perfect little dippers!

Cheesy, buttery, garlicky...  quick & easy...  You can throw these together while your soup is simmering and before you know it dinner is on the table!


I usually use a homemade buttermilk substitute when something calls for buttermilk...  because it's just not something I buy regularly.  If I happen to have it on hand though, I use it.  Either way, the biscuits taste amazing!

Garlic Cheese Biscuits Recipe
adapted from smitten kitchen

Ingredients:
1/2 cup heavy cream
1/2 cup lowfat milk
1 tablespoon fresh squeezed lemon juice
2 1/4 cups all-purpose flour
2 1/2 teaspoons baking powder
2 teaspoons sugar
3/4 teaspoon baking soda
1/2 teaspoon salt
1 - 1 1/2 teaspoons garlic powder (whatever you'd like!)
6 tablespoons cold butter, diced
2 cups shredded cheddar cheese, divided (1 1/2 cups + 1/2 cup)

Directions:
Stir together the cream, milk and lemon juice and let it sit at room temperature for 10 minutes.  (This is a substitute for buttermilk.  Feel free to use 1 cup buttermilk instead if that's what you prefer!)

Preheat the oven to 450°F.  Whisk together flour, baking powder, sugar, baking soda, salt and garlic powder in a bowl.

Blend in the butter with a pastry cutter or your fingertips until mixture resembles coarse meal. Stir in 1 1/2 cups of the shredded cheese.  Add the buttermilk-substitute (or buttermilk!) and stir until just combined.

Knead the dough a few times and dump onto a lightly-flour-dusted surface.  Pat out into a rectangle about 1/2-1" thick.  Cut into 12 pieces (4 x 3).  Place about 2" apart on a parchment-lined baking sheet.  Sprinkle each one with a bit of the remaining 1/2 cup cheddar cheese.  Bake until golden, about 16 to 20 minutes.

10.11.2011

farmer's market pumpkin bars [New Favorites challenge week 4]

For this 4th week of my New Favorites Challenge, I opened up a book I have often passed over on my bookshelf.  I'm not exactly sure why... probably the lack of actual recipe photos?  (I'm a sucker for great food photography!)

Jenny's Country Kitchen Recipes For Making Homemade a Little Easier! by Jenny Wood

I'm so glad I didn't pass over it again this time!  I was looking for a simple, comforting fall recipe to take to my mom's group.  Something sweet, but at the same time not too out of place for breakfast.


These pumpkin bars were perfect!  So quick and easy to throw together, yet packed full of flavor and perfect for fall.  And hey...  a little cream cheese frosting never hurt anybody!

Farmer's Market Pumpkin Bars Recipe
adapted from Recipes for Making Homemade A Little Easier

Ingredients:
for the cake:
4 large eggs
2 cups sugar
1 cup butter, melted & cooled
2 cups (or one 15oz can) pumpkin purée
2 cups flour
2 teaspoons baking powder
1 teaspoon baking soda
3/4 teaspoon salt
1 tablespoon pumpkin pie spice
for the frosting:
1 (8oz) package cream cheese, softened
2 tablespoons butter, softened
1 teaspoon pure vanilla extract
2 teaspoons pumpkin pie spice or cinnamon
2-3 tablespoons milk
4 cups (about 1 pound) powdered sugar, approximately

Directions:
Preheat the oven to 350ºF.  Lightly grease and flour a 15x10" jelly roll pan.

In a large mixing bowl, beat the eggs with an electric mixer until foamy.  Add in the sugar, butter & pumpkin, continue to beat at medium speed for about 2 minutes.

In a medium bowl, whisk together the flour, baking powder, baking soda, salt & spice.  Add the dry ingredients to the pumpkin mixture; beat on low speed until combined.

Pour the batter into the prepared pan.  Bake for 25-30 minutes, or until a toothpick inserted in the center comes out clean.  Cool completely before frosting.

In a large mixing bowl, beat together the cream cheese, butter, vanilla & pumpkin pie spice until fluffy.  Blend in the milk until smooth.  Beat in the powdered sugar, 1 cup at a time, until you've reached the desired consistency.  Spread on the cooled bars, cut and serve!


Related Posts with Thumbnails