1.30.2012

slow cooker lemon chicken & brown rice soup

This version of chicken & rice soup is laced with a tangy hint of lemon and oregano...  2 flavors that pack a punch of brightness and freshness to an otherwise simple soup.

This soup is comfort food at it's finest!

Chicken soup in any form has been one of the only things I can (fairly) easily eat so far this pregnancy.  I have no appetite for anything else, and have to force food down most of the time.

But chicken soup?  I love it!  Chicken Noodle Soup, this Chicken & Rice soup, even Perpetual Chicken Stock, are all things I can eat and enjoy.

So enjoy them I do!


I especially like that the brown rice adds another healthy element to this soup, but feel free to swap it out with white rice if you'd like, or even use half brown and half white if you're not so sure!

Also, if you don't like the idea of your rice being quite mushy (unavoidable cooking that long in a slow cooker, but doesn't bother us one bit!)...  feel free to add it in for the last few hours instead of the whole cooking time!

Oh and if you have any leftover parmesan rinds in your freezer (and please tell me you keep those!  They are gold!!)...  throw one in!  It makes a great soup, amazing!

As with all soups, this just tastes better and better the longer it sits...  so start it in the morning, have some for dinner and reheat it all in the slow cooker again for leftovers the next day!  Delicious!

Slow Cooker Lemon Chicken & Brown Rice Soup Recipe

Ingredients:
1 large onion, diced
2 large carrots, chopped
2 large celery stalks, chopped
1 clove garlic, minced
2 cups leftover cooked chicken (or raw boneless breast or thighs!)
1 cup uncooked brown rice
8 cups chicken stock
salt & pepper, to taste
1/2 teaspoon dried oregano
1/2-1 teaspoon crushed red pepper flakes
2 tablespoons fresh parsley
juice of two large lemons*
1 parmesan rind, optional

Directions:
Dump everything into the slow cooker.  Add more water to top it off, if you'd like.

*If you're not sure how much lemon flavor you would enjoy, start with the juice of one lemon and then add more at the end if you think it needs it!

Turn on LOW and cook for 6 hours or longer, until the chicken is cooked through (if you used raw).  Season with more salt, pepper & lemon juice, if needed, and shred or chop the chicken if you used a whole breast!


1.27.2012

chocolate-covered cherry cheesecake... a beautiful and easy Valentine's dessert!

Valentine's Day is almost here!  Can you believe how fast this year is going already?  January is almost over...  and I still can't seem to even remember that it's not 2011 anymore!

But, February is soon here and if you're cooking at home, it's soon time to start planning your Valentine's Day celebration!


If you've got kids, like us, or maybe you don't have a special someone this year (in which case you should absolutely make this to spoil your beautiful self!) and want to enjoy a quiet evening at home...

Make this gorgeous, easy, delicious cheesecake!


If cheesecake seems like a lot of work, I promise that it's not!

Mostly it's just chilling time, which also translates to...  you can make this ahead of time and have it waiting in the fridge for you!

Perfection!


Chocolate-Covered Cherry Cheesecake Recipe
adapted from Betty Crocker
makes 8-12 servings

Ingredients:
for the crust:
25 regular Oreo cookies, finely crushed
4 tablespoons melted butter
for the filling:
4 (8oz) packages cream cheese, softened
3 large eggs
3/4 cup sugar
1 teaspoon pure vanilla extract (almond extract is great here too!)
1/2 cup heavy cream
1 (21oz) can Lucky Leaf cherry pie filling
for the glaze & design:
1/2 cup heavy cream
1 1/4 cup chocolate chips, divided (1 cup + 1/4 cup)

Directions:
Preheat the oven to 325ºF.    In a medium bowl, stir together the crushed Oreos and the butter until well combined.  Press this mixture evenly into the bottom, and an inch or so up the sides of an un-greased 10" round springform pan.

In your large mixer bowl, beat the cream cheese until smooth.  Beat in the eggs, one at a time, until well blended.

Beat in the sugar and vanilla until smooth.  Beat in the heavy cream until smooth again.

Pour about 3 1/2 cups of the cream cheese mixture onto the crust.  Carefully spoon about 2 cups of the cherry pie filling evenly over the cream cheese mixture.  Then carefully spoon the rest of the cream cheese mixture over the top of the cherries.

Bake for 1 hour to 1 hour 15 minutes, until the cheesecake is just set.  Cool in the pan on a wire rack for 1 hour.

In a small microwaveable bowl, heat the cream on HIGH until simmering... about 1 minute or so.  Stir in the 1 cup chocolate chips until melted and smooth.

Line a rimmed baking sheet with foil or parchment.  Carefully remove the sides of the pan (running a knife around the inside edge first) and place the cheesecake on the lined baking sheet.

Smooth the glaze evenly over the top of the cheesecake, letting it run down the sides a bit.  Refrigerate at least 3 hours or overnight.

Once the chocolate is set (after at least an hour in the fridge or the next day) you can do a design, as fancy or simple as you'd like...  Place the remaining 1/4 cup chocolate chips in a small ziploc bag.  Melt them in the microwave in 15 second intervals, squishing around each time until smooth.

Cut off a tiny corner of the bag and draw your design (practice first... you can't erase and start over!).  Place the cheesecake back in the fridge to chill and set until you are ready to serve!

Serve with more cherry pie filling and freshly whipped cream, if you'd like!

*This post was sponsored by Lucky Leaf premium pie fillings.  I love their products and the fact that they don't use high fructose corn syrup!  I was given the pie filling to review, but as usual...  my opinions are my own!

Go check out their website or their Facebook to see some other fun recipes like slow cooker apple pork roast and cherry chocolate parfaits!


1.26.2012

12 weeks down... 28ish more to go! [baby #3!]

I cannot believe that we are almost to the second trimester of this pregnancy!

I have seen this idea for pregnancy pictures in quite a few places on the web lately, and I just thought it looked like such a fun idea.  I am hoping to make a cute little book of these for baby when I'm done!

(click on the picture to see it bigger, if the text is too small for you!)


This pregnancy has been so different from the others.  In fact, they have all been so different from each other!

With Bjørn (baby #1), I was so sick for the first half-ish of the pregnancy.  I couldn't even keep down water most days!

With Haakon (baby #2), I was not sick even one day!  I didn't know I was pregnant until 10 weeks, because it was unexpected and there were no symptoms!

With this baby (baby #3), I have been sick and miserable for weeks, but no throwing up.  Just nauseous and tired with absolutely no appetite.  So, I guess just about half-way in between the other two pregnancies.

The biggest difference Hubs and I have both noticed with this pregnancy is that my brain is completely fried.  And I do mean completely.  

I can hardly remember my own name half the time, let alone my grocery list or what my husband just said on the phone.

And baking & cooking?  My goodness.  Everything has gotten 10 times harder than it used to be.  I don't know how I even do it half the time!

Needless to say, I'm hoping this problem improves as the pregnancy progresses...  I don't know where we'll end up if it gets worse!  :o)

I will leave you now with a little glimpse of baby.


Oh and a fun comparison picture!

Here is the bump at 12 weeks in 3 different pregnancies.  Crazy!


Thanks for putting up with my pregnancy-ramblings!  I'm sure this won't be the end of them!!


1.25.2012

coconut almond (or Almond Joy!) granola

Coconut Almond if you're feeling healthy...  Almond Joy if you're not!  :o)


This granola is chockfull of good-for-you stuff.  Raw coconut oil, raw honey, oats, almonds...  and then a little hint of chocolate, if you'd like, for the Almond Joy lovers in the world!


I usually only add chocolate chips to part of the batch after it's cooled for snacking on by the handful.  The rest I leave plain for eating with milk or yogurt and fruit!


Oh and if you are a close friend or family member...  this granola (without the chocolate chips, of course!) tastes a whole lot like Grandpa Cookies!  Ahhh...  comfort food.

Coconut Almond (or Almond Joy) Granola Recipe
adapted from He Sows, She Sews
makes about 4 cups of granola...  this recipe can be easily doubled!

Ingredients:
3 cups old-fashioned rolled oats
1/2 cup chopped or sliced almonds
1/2 cup flaked coconut, sweetened or unsweetened
1/4 cup melted virgin coconut oil
1/4 cup honey (preferably raw)
2 1/2 tablespoons water
1 teaspoon pure vanilla extract
1/2 teaspoon salt, to taste (I like a bit more added on after baking!)
1/2-1 cup mini chocolate chips, optional

Directions:
Preheat the oven to 350ºF.

In a large bowl, combine the oats, almonds & coconut...  stirring to mix well.

In a small bowl, whisk together the remaining ingredients, except for the chocolate chips.  Pour the wet ingredients over the dry ingredients, mixing well to coat.

Spread the granola onto a large rimmed baking sheet and bake for 20-30 minutes, stirring after 10 minutes and then every 5 minutes after that, until the granola is perfectly golden brown...  watching it closely at the end and being careful not to let it burn!

Let cool completely before adding chocolate chips, if you are going to, and storing in an airtight container.


1.24.2012

homemade powdered laundry detergent... with Dr. Bronner's!

Yesterday I whipped up a batch of laundry detergent in less than 5 minutes.

Yep, it's true...  and I can't even think about going to the store in less than 5 minutes, much less get there, buy laundry soap and get back home!


I have made homemade laundry detergent before (this whipped version!) and love how economical it is...

But I must say this method is my favorite so far, just because of the ease of prep.

I couldn't believe how fast it came together!!

I also started my big laundry day and the clothes are coming out great.  I especially love the faint smell of peppermint...  yum!

I used Dr. Bronner's soap (I used peppermint for this batch because I sent my husband to the store, but I would love to try the lavender next time!) because I am not a huge fan of the smell of Fels-Naptha bar soap.

You can find 20-Mule Team Borax and Arm & Hammer Washing Soda (not the same as baking soda!) in your store's laundry aisle.  Baking soda will be in the baking aisle where baking soda is.  Or in your cupboard.  :o)

Dr. Bronner's soap will be with the organic natural stuff (not with the regular soaps probably!) or you can order it online here!

Try this next time you are about to run out of laundry soap.  If you're like me, you may never go back to buying pre-made again!!

**This batch makes about 4 1/2 cups of Detergent, or 36 loads.**

Because it is so easy to whip up, I like to make a smaller batch for storage reasons.  Feel free to double, triple or whatever this recipe to make as much as you'd like to make and store at one time!!

Homemade Powdered Dr. Bronner's Laundry Detergent Recipe
adapted from Heart Cries

Ingredients:
1 bar Dr. Bronner's soap (or Fels-Naptha, if you can't find Dr. Bronner's!)
1 1/2 cups Borax
1 cup baking soda
1 cup washing soda

Directions:
Grate the bar of soap using the large holes of your box grater, or a food processor shredding attachment like I did.

Then, if you have a food processor, dump the shredded soap in the processor with the regular blade attachment and pulse until you have small bits.  If you don't have a food processor, and your shreds are fairly large, chop them up with a large knife until they are smaller.

In a large bowl, mix together the grated soap, borax, baking soda and washing soda until combined.

Dump this into a lidded container and use 2 tablespoons (1/8 cup) per full load of laundry!


1.23.2012

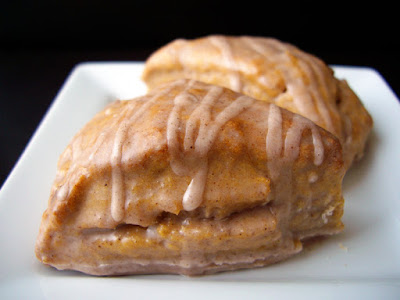
mini pumpkin scones with cinnamon glaze

I absolutely adore Starbucks pumpkin scones.  They are so hard for me to resist when I see their perfectly glazed sweetness sitting in the case.  So hard to resist.

But now...  now I can make them at home, better and cheaper than the originals, and enjoy them whenever I want!


Every week I get to go spend the morning with a beautiful group of moms and enjoy some kid-free quality time doing book discussions, hearing from guest speakers, and just plain visiting.

Plus the kiddos absolutely adore their classes and look forward to Monday mornings like it's the best day ever!

We take turns bringing treats to share and this week is my turn.  I didn't even have to think twice about what I would bring...  These scones have been calling my name for weeks!

I like to make these scones small, so they serve more people and because...  really...  giant scones are just ridiculous!  (Besides...  everything tastes better when it's cute and little, right?)

These scones (all scones, really!) whip up so easily, and also freeze beautifully - baked or unbaked.

So make a batch, even if you don't want to eat them all right now...  enjoy one (or 3!) with your morning coffee and freeze the rest for another day!

Mini Pumpkin Scones with Cinnamon Glaze Recipe
adapted from Noshings
makes 16 small scones

Ingredients:
for the scones:
2 cups flour
1/3 cup brown sugar
2 teaspoons baking powder
1/2 teaspoon salt
2 teaspoons pumpkin pie spice
1/2 cup butter, frozen & then grated
1/2 cup pumpkin purée
1/2 cup heavy cream
for the glaze:
1/4 cup milk
1 teaspoon cinnamon
pinch of salt
1 1/2-2 cups powdered sugar

Directions:
In a large bowl, whisk together the first 5 ingredients.  Mix in the frozen, grated butter with a pastry blender, or your fingers, until the mixture resembles coarse crumbs.

In a small bowl, stir together the pumpkin and heavy cream.  Gently and quickly stir it into the flour mixture until just moistened, and then gently knead the dough a few times until it all comes together.

Divide the dough in half, pat each half into a round about 1" thick, and then cut each half into 8 small wedges.  Place the wedges on a parchment-lined baking sheet and then place in the freezer to chill for about 30 minutes.

While they are chilling, preheat the oven to 400ºF.  Bake the scones for 18-20 minutes, until light golden brown and set.  Let cool completely on a wire rack before glazing.  (This is also a good time to freeze them, and then when you want to use them again, let them thaw for a bit and then glaze them!)

In a medium bowl, whisk together the glaze ingredients, except for the powdered sugar.  Whisk in the powdered sugar, a little at a time, until the glaze is the consistency you'd like.

You can spoon the glaze on top of the scones, or - like me - dip each scone in the glaze to completely coat and then set on parchment or a cooling rack to set completely.  (I usually take the leftover glaze and drizzle it over the glazed & set scones for decoration!)

(Why do I like to dip my scones?  Well, besides loving the glaze, if you dip the whole scone - the glaze acts as somewhat of a sealant, keeping the scones fresh, moist and delicious longer!)


1.20.2012

coffee cake for one

I couldn't resist trying this when I saw the idea online.

I love coffee cake...  it's one of my favorite foods!

But I don't always love making a big pan when I'm just craving something sweet with my morning coffee, and then proceeding to eat that whole pan over the course of the day.


This recipe keeps my self-control in check.

One mug.  One serving.  One coffee cake all for me!

(Of course, if you make 2 of these mug-fulls at once, then you don't have to waste the other half of that egg!)

Coffee Cake for One Recipe
adapted from Prudent Baby

Ingredients:
for the cake:
1 tablespoon butter, softened
2 tablespoons sugar
1/2 of a large egg*
2 tablespoons sour cream
1/8 teaspoon pure vanilla extract
1/4 cup flour
1/8 teaspoon baking powder
for the topping:
1 tablespoon butter, softened
2 tablespoons flour
2 tablespoons brown sugar
1 teaspoon cinnamon

Directions:
Preheat the oven to 350ºF.

In a smallish mug, stir together the butter and the sugar until fluffy, about 30 seconds.  Stir in the 1/2 egg and blend well.

(*To measure 1/2 an egg, break an egg into a small bowl or glass and whip gently with a fork.  Then use 1/2 that amount.)

Stir in the sour cream and vanilla until smooth.  Stir in the flour, baking powder and salt until just combined.

In a separate small bowl, mix together the butter, flour, brown sugar and cinnamon...  rubbing it all together with your fingers until moistened and crumbly.

Dump this mixture on top of the batter in the mug and bake for 30-45 minutes (depending on the size of your mug!) until puffed and a toothpick inserted in the center comes out clean!


1.19.2012

vanilla snow ice cream

We have snow!  We have snow!!

Finally we have enough snow to make snow ice cream!


I have been waiting for this day all winter long...

See, you need a good several inches of snow dumping down in order to make this stuff.  And we rarely get even one day of that out here in the northwest...  but it's finally here!

Please don't scrape off enough out of the tiny dusting on your porch if you aren't in the midst of "Snowmaggedon" like we are.  That would be kind of gross.

And please stay away from yellow snow.  Thank you!

Vanilla Snow Ice Cream Recipe
adapted from Paula Deen

Ingredients:
8 cups fresh snow
1 1/2 cups sweetened condensed milk (most of one can)
1 1/2 teaspoons pure vanilla extract

Directions:
Fill a large bowl with the fresh snow (lightly, don't pack it down!).  Pour the sweetened condensed milk and vanilla over and stir quickly and lightly to combine.

Serve immediately...  with chocolate sauce, of course!


1.18.2012

slow cooker rich & creamy hot chocolate

In honor of our first real snow of the season (and it's a good one...  8" on the ground so far!) here's an easy homemade hot chocolate recipe that will cook itself while you play outside with the kids!

This hot chocolate is everything we love.  Thick, creamy, rich, chocolate-y...  it is just plain delicious!


This is definitely not your open-a-packet-and-add-some-water hot cocoa.  It actually reminds me more of that sipping chocolate that Starbucks had a few years ago.

Oh and the best part?  You throw it all in the slow cooker and you've got perfect hot chocolate without the work!

We like to enjoy ours with Peppermint Schnapps (for the non-pregnant grownups!) or peppermint syrup (for the rest of us!) and lots of marshmallows or whipped cream!

Slow Cooker Rich & Creamy Hot Chocolate Recipe
adapted from Mrs Happy Homemaker
makes 10-12 servings

Ingredients:
1 1/2 cups heavy cream
1 (14oz) can sweetened condensed milk
6 cups milk (or 2 cups milk & 4 cups water for a lighter version!)
1 cup semi-sweet chocolate chips
1 cup milk chocolate chips
1 teaspoon pure vanilla extract

Directions:
Dump all ingredients into the slow cooker, stir and cook on low for at least 2 hours, stirring occasionally if you think of it.

Serve hot with fresh whipped cream or lots of marshmallows (and a shot of peppermint schnapps for the grown-ups!).


1.17.2012

fresh lemon pudding

You know that moment when you are standing at the stove whisking and whisking and whisking...  for what feels like forever...  and then all of sudden the sugar and eggs and milk that you are stirring become perfectly thick and luscious on your spoon?

That moment is why I love to cook.

I love the feeling of taking simple ingredients that may even seem boring on their own, combining them and ending up with something utterly different and amazing.

Like this fresh creamy lemon pudding.


Sugar, milk, eggs, lemon...  simple, yet beautiful ingredients...  that together become a luxurious thick, creamy, tart and sweet lemon pudding.  Perfect for a refreshing treat after a rich winter's meal!

(Now, if you're like me...  the words lemon & pudding together just don't seem to bring up a mental image of anything amazing.

But please, please ignore those thoughts and make this pudding.  If you like lemon...  you will love this pudding!  I promise!!  It's like perfect lemon curd, lightened with cream, perfectly sweet and tart at the same time!)

I can't wait to make this lemon pudding in the summer and eat it with a big bowl of fresh, ripe strawberries.  I'm drooling just thinking about it!

Fresh Lemon Pudding Recipe
adapted from Luscious Lemon Desserts
this recipes makes 4 servings and uses 2 large lemons

Ingredients:
3/4 cup sugar
1/4 cup cornstarch
2 cups lowfat milk
1/2 cup heavy cream
2 tablespoons lemon zest (from two large lemons)
3 large egg yolks, lightly stirred
1/2 cup fresh squeezed lemon juice
2 tablespoons butter, softened

Directions:
In a medium, heavy saucepan, whisk together the sugar and cornstarch.  Whisk in the milk, cream, lemon zest and egg yolks until combined.

Turn the heat on to medium and cook, stirring frequently at first and constantly at the end, until the mixture thickens.  (Thick enough...  if you dip a spoon in the mixture, hold it upright and then draw your finger across the back of it, the mixture should not drip back down the spoon covering the line you drew!).

Remove the pot from the heat and stir in the lemon juice and butter until smooth.

Pour the mixture through a fine-mesh sieve and then pour into a large bowl or individual serving dishes.

Let cool to room temperature and then place in the fridge to chill and set for at least 2 hours or up to a day (covered with plastic wrap if you are chilling for longer than a few hours!).

Serve with fresh raspberries, smashed raspberries or raspberry freezer jam.  Or a bit of freshly whipped cream if you'd like!


1.16.2012

caramel peanut butter snickers brownies

Another brownie recipe?!

Yep!  Fudgy dark chocolate brownies with a swirl of luscious caramel sauce and rich gooey chunks of peanut butter snickers throughout...

Mmmmm...


It just hit me how many brownie recipes I have on here...  

It might be something of an obsession, I think.

Wanna check out the rest?  

Here are most of them, I think:

Uffda.  Do you think I need a brownie intervention?

In my defense...  I really do think these caramel snickers ones may be the best brownies I have ever made.  Snickers are never a bad thing, but I really, really love the swirl of caramel throughout.  

I don't know if I will ever be able to make brownies without that again!


(Oh and for those of you who were wondering...  yes, my camera is still broken.  No, I have not gotten a new one yet.  My husband found his old point and shoot, and it's working just fine for now.  I'm really hoping it holds out long enough for me to save up for the camera I really want, instead of just having to buy what we can afford right now!)

Caramel Peanut Butter Snickers Brownies Recipe

Ingredients:
3/4 cup dutch-processed unsweetened cocoa powder
1/2 teaspoon baking soda
2/3 cup butter, melted & divided (1/3 cup + 1/3 cup)
1/2 cup boiling water
2 cups sugar
2 large eggs
1 teaspoon pure vanilla extract
1/4 teaspoon salt
1 1/3 cups flour
1 cup chocolate chips
1/4 cup caramel sauce*
10 snack-sized Peanut Butter Snickers squares

Directions:
Preheat your oven to 350ºF and butter a 9x13" glass baking dish.

In a large mixing bowl, stir together the cocoa and baking soda.   Stir in 1/3 cup of the melted butter until smooth.  Stir in the boiling water until the mixture is smooth and thick.  Stir in the sugar and eggs with the remaining 1/3 cup melted butter, vanilla & salt.

Place the chocolate chips in a small bowl and sprinkle with 1 teaspoon of the flour, tossing to coat.

Into the chocolate mixture, stir in the remaining flour until just smooth.  Stir in the flour-coated chocolate chips and spread the mixture into your prepared baking dish.

Drizzle the caramel sauce all over the top of the batter (*I use my homemade caramel sauce, but any good caramel sauce would work!).  Cut the Peanut Butter Snickers into quarters and press them all evenly over the batter, pressing them down gently.

Bake for 35-40 minutes, or until the edges start to pull away from the pan.   (It's always better to under-bake than to over-bake brownies!) 

Enjoy with a big hot cup of coffee, or a cold glass of milk!


1.14.2012

more good reads...

Here are a few more of my favorite internet reads lately!

I read a lot of good stuff everyday...  but there are a few things that I come across that I just can't help but share.

These are the posts that bring me to tears, or leave me laughing out loud.  The ones I think about over and over again as my day goes by.

The ones I go back to, to fill my heart on dry days.

Enjoy!

(image source: pinterest)

-----

In which I practice realistic expectations - another beautiful Practices of Mothering post from Emerging Mummy

I love Sarah's words here...  not only on keeping realistic expectations for our tinies, but also for keeping realistic expectations for ourselves!
-----

change the world with a diaper change - by lowercase letters

Beautiful.  Just...  beautiful.
-----

How to Talk to Little Girls - from Huffington Post

This is such a great reminder on how we really should treat our girls.  Praise their brains, not just their beauty!
-----

Why I Hate Religion, But Love Jesus - Spoken Word

This YouTube video is amazing.  Absolutely amazing.  Brings tears to my eyes and AMEN to my lips!  The title says it all.  Please go check it out!  
-----

Rebirth: What We Don't Say - by The Sage Mama

This article is so my life right now.  Finding the new me after my children have erased the old.  And no, that is not a bad thing!  Love this!!
----

1.13.2012

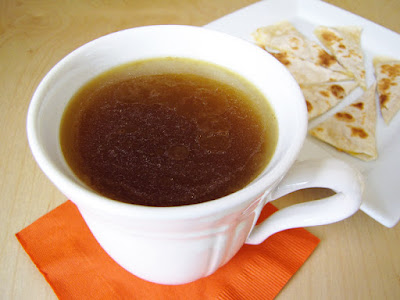
perpetual slow cooker chicken stock

When I first saw this recipe from Nourished Kitchen for perpetual chicken bone broth, I was instantly intrigued and had to try it for myself.

If for no other reason than simplicity and anytime access to chicken stock (which I love to use!)...  although I must admit the easy nutrients sounded pretty good to me too!


I had some leftover turkey legs and bones from Thanksgiving, so I threw those into my slow cooker with half an onion, a few cloves of garlic and some peppercorns...  covered everything with water and turned the slow cooker on for the week!

A week?  The slow cooker is on for a week?!  All the time?!  Yep!

And besides the bit of warmth it adds to our house (so nice during these cold winter months!), it also keeps our house smelling deliciously like homemade chicken soup.  Yum!

According to Jenny, this broth tastes lightest on day 1 (24 hours after starting), richest on day 5, and then lighter again on day 7.

I am on day 4, and it has been amazing each day...  I can't wait to taste how good it is on day 5 if it's only going to get better!

As you dish up some broth to sip, or use in your soup or cooking, simply replace with fresh cold water and there you have it...  perpetual chicken stock!

At the end of the week, you should be able to easily crush the end of a bone with your finger tips.  That is how you can tell that all of the nutrients have been given.  If they haven't, feel free to continue to use another day or so!

Perpetual Slow Cooker Chicken Stock Recipe
adapted from Nourished Kitchen

Ingredients:
1 chicken carcass, or bones - raw or previously cooked*
an onion, peeled and quartered
a few cloves of garlic, smashed and peeled
a tablespoon or so of whole peppercorns
some parsley leaves and stems, if you have them

Directions:
Place all the ingredients in the slow cooker.  Fill to the top with cold, filtered water, cover and cook on low for at least 24 hours or up to 7 days!

As you dish up a serving, pour through a fine mesh strainer or a reusable coffee filter.  Season to taste with salt and replace that amount of water into the slow cooker to keep the broth going.

*You could also place a whole chicken in the slow cooker and then remove it and take off the meat for another use when it's cooked through.  Return the carcass to the pot and continue with your stock!


1.12.2012

apple cinnamon slow cooker steel-cut oatmeal

Steel-cut oats, cooked all night in the slow cooker with apples and lots of cinnamon...  breakfast has never been so easy and the house smells amazing when you wake up!


We all know I love my oatmeal.  Especially when it's steel-cut and slow-cooked.

This version is a kicked-up version of my original...  I must say, I am a classic girl and the original version is still my favorite, but the kids loved this one and I'm sure I will be making it often!

Oh! ... this oatmeal reheats wonderfully, so even if you are making this just for you...  portion it out when it's done and store in the fridge.  After a quick microwaving with a little milk or water, you've got instant breakfast all week!


Apple Cinnamon Slow Cooker Steel-Cut Oatmeal Recipe
makes 4-6 servings

Ingredients:
1 cup steel cut oats
4 cups water
1/2 cup milk
1 large apple, cored and finely chopped
1 tablespoon cinnamon
1/2 teaspoon nutmeg
1/2 cup, or so, brown sugar (your preference!)
1/2 teaspoon salt
1/2 teaspoon pure vanilla extract
1 tablespoon butter

Directions:
Dump all ingredients into your slow cooker.  Stir, turn on low and cook overnight while you sleep.

In the morning, stir again (as it will still look watery and seperated) and it will come right together and be ready to serve!


1.11.2012

pretty pink peppermint chip rice krispies treats

Yep.  That's a mouthful, isn't it?  But it's the truth!

These rice krispies treats are pretty, they are pink, they are pepperminty and they are full of chocolate chips!


I made these yesterday because I miss my husband.  And he loves rice krispies treats.

But I clearly wasn't thinking (am I ever these days?!) because I am not a huge fan of sweets right now (unless it is in the form of ice cream!) and he is not home to eat them!

Oh well.  They are wrapped up well and I hope they will still taste good when he gets home!

Now, you do need to find these cute little pink and white peppermint-swirled marshmallows.  I found them at WalMart recently.  (They are amazing in hot cocoa, by the way!)


You do not, however, need to have your own personal photographer...  although I do find that mine makes everything more fun!  


If you can find these marshmallows, try this soon!  If you can't, feel free to use regular marshmallows, just add a bit of peppermint extract and some red food coloring to the marshmallows as they are melting!

Enjoy!


Pink Peppermint Chocolate Chip Rice Krispies Treats Recipe

Ingredients:
1/4 cup butter
1 (10.5oz) bag mini peppermint marshmallows
8 cups Rice Krispies cereal
1 cup mini chocolate chips, divided (1/2 cup + 1/2 cup)

Directions:
Butter a 9x13" dish and set aside.

In a large pot, melt the butter over medium-high heat.  Stir in the marshmallows, stirring constantly until melted and smooth.

Remove the pot from the heat and stir in the Rice Krispies until well mixed.  Gently, and quickly, stir in 1/2 cup of the chocolate chips.  They will melt a bit, so act quickly to keep from getting a brownish pink blob!

Press the mixture into the buttered pan and pat down with wet fingertips (dip them into a glass of cold water).  Sprinkle the remaining 1/2 cup chocolate chips on top and press them gently down with your palms.

---

Bjørn loves to play "camera" with mommy.  Today he thought it would be a good idea for him and I to trade cameras.


Nice try, bud...  nice try.  :o)


1.10.2012

finding normal...

This holiday season just seemed to get crazier and crazier as time went on.  With holidays and family, a funeral and lots of memories...  we are just now getting back into the swing of things.

Back to finding normal.

What is normal?  I have no idea.

All I know is that normal right now consists of a 10 year old, a 2 1/2 year old, a 1 year old, a tired pregnant mama, and a busy new-business-starting daddy!

I have been missing my kitchen like you would not believe (or I suppose you would believe!)...

Well, actually I miss cooking what I feel like cooking, instead of what I have to cook, you know?

Hopefully I will be able to get some groceries soon and get busy.

The idea-list in my head gets longer every day and I think I just may explode if I don't get some creativity out!  :o)

Thank you all for your prayers and patience through this emotional holiday season.

I hope to be back to 'normal' very soon!!

(And since I can't leave you without a cute kiddo pic...  check this little olive-loving guy out!)


1.05.2012

happy birthday to... me?

Well, yes...  technically.

But more importantly...  Happy Birthday to YOU Grandma!


I love you, I miss you, and I will always cherish the years we spent celebrating together.

I know you are having the most amazing birthday ever with all of the family and friends who have been waiting so patiently for you...

I must admit, I'm a little jealous.  :o)

Happy Birthday Grandma!

Thank you for instilling in me a deep love for food and baking, and for being a huge part in shaping me into the woman I am today.

I love you!


1.01.2012

my favorites of 2011

I ended the year with a list of your favorite recipes of 2011.

I am starting the new year with a list of my 11 favorite recipes of 2011!

These are the ones that I keep going back too, and pulling out for company and special occasions...

The ones I think about and drool over and want to make over and over again...

The ones I will be making many times in the new year, I'm sure!!

(These recipes are in order of date, not preference...  it was SO hard to narrow down to my top 11, but these are definitely the winners!)

#1  homemade Starbucks cranberry bliss bars


#2  buffalo chicken mac & cheese


#3  lemon chiffon truffles


#4  copycat Olympia Pizza's pepperoni subs


#5  cinnamon & vanilla slow cooker steel-cut oatmeal


#6  not-so green smoothie


#7  blueberry nectarine crumb bars


#8  easy homemade pure vanilla extract


#9  farmer's market pumpkin bars


#10  eggnog latte sugar cookies


and #11...  super creamy stove-top mac & cheese!  (I just made this again the other day!)


Happy New Year everyone!

Here's to a beautiful 2012 full of food, friends and more blessings than we can imagine!!


Related Posts with Thumbnails