6.29.2012

4th of July fun...

It's that time again...

Time to start planning our 4th of July menus!

We don't have any big plans, but I just can't let a holiday go by without some special food.

Here's what I'm thinking:

This tomato-feta salad will be made for sure


And something grilled...  maybe some burgers or steak kabobs


Fresh blueberries for a little something blue (and to satisfy my insane fresh-fruit cravings right now!).

Oh, and I am absolutely loving these red, white and blue strawberries from Taste and Tell...


And since it's perfect strawberry-season right now, maybe I'll whip some up for us to snack on!

Aren't they adorable?

There will be fun drinks for sure.  (It wouldn't be a holiday without them!)

I can pretty much guarantee the husband will be making his fresh-squeezed homemade margaritas...

And maybe I will whip myself up some virgin blended piña coladas!


I'm hungry already!!

Do you have big plans for the 4th?  Fireworks?  Food??  Or just a mellow day at home?


6.28.2012

fresh cherry almond yogurt parfaits

I am a huge fan of fresh fruit and yogurt parfaits.  Something about the combination of flavors and textures just always makes me happy.

And this is one of my favorite combinations yet!


Fresh, juicy, sweet Bing cherries just couldn't be any more perfect right now and I love the hint of almond complementing the cherries.

(I also discovered some amazing granola recently in our short visit to the Gluten Free world.

Udi's has a great variety of all-natural gluten free granolas, and since they are still just as wonderful as any other non-gf granola, we are happily eating through our stash...  even though we aren't trying to have Bjørn eat gluten free anymore.)

Of course a generous topping of delicious granola is crucial for a great parfait!


Give this a try next time you've got a parfait-craving, or want to impress some breakfast or brunch guests.  So fun!

Fresh Cherry Almond Yogurt Parfaits Recipe

Ingredients:
plain yogurt
pure almond extract
fresh cherries, pitted & halved
your favorite granola

Directions:
In a small bowl, stir together some of the yogurt with a splash of almond extract.

Layer in a mason jar or a pretty glass:  cherries, almond yogurt & granola.  Repeat layering as often as you'd like!

Serve immediately or store for up to several hours in the fridge.

6.26.2012

Nutella-swirled Rice Krispies treats

Am I the only person who can't seem to stay out of the kitchen when I have way too much other stuff to do?

Like packing for a week of camp with the kiddos?

And cleaning the house so the husband doesn't have to go stir-crazy while we're gone?

And getting all the laundry and dishes done so they're not waiting for me when I get home??


Oh, I'm not?

Good.

Yesterday I decided that making Rice Krispies treats sounded way more fun than packing and cleaning.

First I made Andrew a pan of plain ones for the week (you know, so he doesn't forget about me!)...

And then I decided to make a pan of Nutella-swirled ones for you guys.


Ok, ok...  they might have been for me.  But, I totally would have shared them with you if you were here!

As it is, you'll just have to make some for yourself and pretend I shared them with you.

Nutella-Swirled Rice Krispies Treats Recipe

Ingredients:
4 tablespoons butter
1-10oz bag large marshmallows
1/2 cup Nutella
1/2 teaspoon pure vanilla extract
8 cups Rice Krispies cereal

Directions:
Line a 9x13" pan with foil and butter the foil generously;  Set aside.

In a large bowl, melt the butter in the microwave for about 40 seconds.  Stir in the marshmallows, coating with the melted butter and microwave an additional 1 minute 30 seconds, stirring after 45 seconds.

Stir the marshmallows well, until they are all smooth.  Microwave a few seconds more if they aren't smooth yet!

Drop the Nutella into the melted marshmallow mixture and microwave for another 20 seconds.

Pour in the vanilla and stir a few times, just to spread out the Nutella a bit.  Don't worry about mixing it all in.

Stir in the Rice Krispies until everything is evenly coated.  Scoop the mixture into your greased 9x13" pan and press down gently (get your hands wet and then shake off the excess water to make this process the least messy!).

Let cool for a bit before cutting for prettiest results.  Or dig in right away if you have no one to impress!


6.25.2012

a fun, new summery drink!


You all know I love to share fun new things with you when I find them.

This new summer-drink is no exception!

We (and by we, I mean my husband and friends, because being 7 months pregnant I am obviously not drinking these days!) recently discovered Michelob ULTRA Light Cider, a brand new different & fun summery drink.


I was bummed that I couldn't have any, but my husband did a great job of describing it to me:

"It's a fresh, crisp, very light & sweet summery drink.  Almost like having a nice cold lemon-lime soda, but with a kick and a sweet hint of apple behind it.  Very refreshing and very easy to drink, it makes you feel like you should be laying in the sun by the pool!"

Sounds pretty good to me!  I am looking forward to trying it myself later this summer...  hopefully over a glass of crushed ice, while I'm laying by the pool!

Michelob ULTRA Light Cider is a much lighter version of a traditional hard cider.  1/3 fewer calories*, much less heavy, sweet and just overall more refreshing.  It would be a great substitute for your usual white wine or champagne!

And another fun little tidbit that makes me smile...  It is naturally sweetened, made from hand-picked apples, and it also happens to be Gluten Free!

My eyes have recently been opened up to the world of Gluten-Free eating, and even though it's not a need in my family right now, it still makes me happy to see more and more companies embracing the needs of people who used to have such a hard time finding fun new things that they could enjoy without worry.

If you're looking for a refreshing treat next time the sun is out and you'd like to try something new, give this Light Cider a try!

Want to know more?  Check out Michelob's website (Sponsor's Site) or the Michelob ULTRA Light Cider page on Blogher.com!

(Michelob ULTRA Light cider is available nationwide in six-packs of 12-ounce clear glass bottles...  on their website there's a handy little tool where you can plug in your zipcode for a specific list of stores where it's available near you!)


*Michelob ULTRA Light Cider has 1/3 less calories than an average of the leading regular hard ciders, 120 cal./serving in light hard cider vs. 180 cal./serving in an average of the leading hard ciders!

**Dislaimer:  This is a paid review for BlogHer and Michelob.  I was given this product free to review.  My opinions are my own (and my friends and family's!) and only what I would say to you if you were sitting with me at my kitchen table!

6.23.2012

perfect, extra moist banana bread

Do you have a signature recipe?

A treat or meal that you have been making for years, over and over again...  so often that you could practically make it in your sleep?


This banana bread is mine.  In fact, I think my husband will be a little bit upset with me for sharing this with you...

He thinks this should be one of those 'kept under lock and key forever and ever' recipes.


But you know what?

I love you.

And because I love you, I want to share this special treat with you.

And since I can't make you all little loaves of banana bread and sit with you and visit, I'm going to share this recipe with you and hope that you'll try it.


I love a good slice of fresh banana bread with my morning coffee, and since I can get this bread into the oven in about 10 minutes (or pull it out of the freezer...  it freezes beautifully!), it's a quick and delicious treat for those 'banana bread days'.

Maybe someday we can all slather some butter on our warm banana bread, pour ourselves a cup of coffee (or tea!) and have a chat!  Wouldn't that be lovely?


Perfect, Extra Moist Banana Bread Recipe

Ingredients:
1/2 cup butter, softened
1 cup sugar
2 large eggs
1 1/2 cups flour
1 teaspoon baking soda
1/2 teaspoon salt
1 cup mashed very ripe bananas
1/2 cup sour cream
1 teaspoon pure vanilla extract
1/2 teaspoon ground cardamom (or nutmeg)

Directions:
Preheat the oven to 350ºF.  Butter a 9x5" loaf pan.

Cream together the butter and sugar until fluffy.  Beat in the eggs.  In a medium bowl whisk together the flour, baking soda & salt.  Add to the creamed mixture and mix until just combined.

Mix in the bananas, sour cream & vanilla.  Pour into the pan and bake for about 60-70 minutes, until a toothpick inserted in the center comes out clean.

This bread does not need extra butter on top, it's so moist.  But, that has never stopped me from putting butter on my slices!  :o)


6.21.2012

no effort slow cooker cleaning

I have finally figured it out!!

After years and years of soaking, scrubbing, soaking & scrubbing over and over again to get my crockpot inserts clean after particularly stuck-on messes, I finally figured out the best and easiest way to clean them.

Want me to share?


Ok, here's what you do:

1.  Take your dirty, gross, burnt-on food crusted crockpot...

2.  leave it in the base...

3.  fill it up with hot water and a few squirts of dish soap...

4.  turn it on LOW and walk away!

Let the soapy water 'cook' overnight, or even for a day or more if you've got a really big mess (think chili that sat in the slow cooker - on - for almost 2 days!).

When you're ready, dump out the hot water, do a quick swish with a brush or rag and your crockpot will be clean as a whistle!  (If it's not, add more hot water and soap and just let it cook longer!)

Enjoy your clean slow cooker with no effort at all!

Does this make you as excited as it does me?  I feel like I just gained years of my life back and a whole new joy-obsession with my slow cooker!!!

And, I will be making this slow cooker steel-cut oatmeal tonight.  And not caring one bit about the burnt on bits that are pretty much inevitable!


6.19.2012

baked butternut squash and bacon mac & cheese

Butternut squash is not something I usually crave.

I just don't ever walk by it in the grocery store and think 'man, I've gotta have some of that!'


But...  when it shows up in my kitchen (from a farm-share or Bountiful Baskets, for example) I always end up enjoying it much more than I expected!


This recipe is a perfect place to put your butternut squash.  Especially if you've never tried it or if you're not sure if you like it.

Cheesy, gooey, creamy mac & cheese, with a lovely sweet background from the squash.  You really can't go wrong with this dish!


Especially with all that bacon...  how could it not be good?!

(And the healthy squash cancels out all the other not-so-healthy stuff right?  Right??)

Oh, and in case you were wondering...  this earned rave reviews from 10 year old Navy, who was completely convinced it would be disgusting!

Baked Butternut Squash and Bacon Mac & Cheese Recipe
adapted from How Sweet It Is
serves 6-8

Ingredients:
1 butternut squash, peeled & cut into about 2" pieces
2-3 tablespoons olive oil
salt & pepper, to taste
1 teaspoon ground nutmeg
1 lb penne (or other short) pasta
4 tablespoons butter
1 large onion, chopped
1 clove garlic, minced
2 tablespoons flour
1 cup milk
1/2 cup heavy cream
4oz cream cheese
1 cup crumbled bacon
1 cup shredded cheddar or mozzarella cheese, divided (1/2 cup + 1/2 cup)
1 cup freshly grated parmesan cheese, divided (1/2 cup + 1/2 cup)
crushed red pepper flakes or cayenne pepper, to taste

Directions:
Preheat the oven to 400ºF and line a large rimmed-baking sheet with foil.

Toss the butternut squash with the olive oil and salt, pepper & nutmeg until evenly coated.  Place in the oven and roast for about 45 minutes, stirring once after about 20 minutes.

Once the butternut squash is golden and tender, remove it from the oven.  Dump it into a large bowl and mash well with a potato masher until fairly smooth;  Set aside.

Cook the noodles according to package directions.  Meanwhile, heat a large saucepan over medium-high heat and melt the butter in the pan.

Stir in the onions with a bit more salt & pepper and let cook, stirring occasionally until the onions are soft and just starting to brown a bit on the edges.

Stir in the garlic and cook for about 30 seconds, then whisk in the flour and cook, stirring often, for about 2 minutes.

Reduce the heat to low and stir in the milk, cream and cream cheese, stirring occasionally to let everything melt and warm up.  Stir in the butternut squash purée, taste for seasoning and turn off the heat.

Once the noodles are cooked, scoop out about 1 cup of the pasta water and set aside.  Drain the noodles and toss them into the pan with the sauce, adding as much of the reserved pasta water as you need to coat the pasta evenly.

Stir in the crumbled bacon and 1/2 cup of each cheese and then dump everything into a buttered 9x13" pan.

Toss the remaining cheeses together and sprinkle them over the top of the pasta.  Bake for 20-25 minutes until everything is bubbly and golden on top!


6.18.2012

my love...


I know this is coming a day late, but that doesn't change how I feel about my sweet husband.

The love of my life, the wonderful daddy of my children, and the best friend a girl could ever ask for.

Andrew, I am so proud of you and I love you so much.

You take such good care of our family...

And every day that I get to wake up and see the sheer joy on our children's faces when they see you, I love you even more.


We are so blessed to have you as ours...

Happy Father's Day!!!

6.16.2012

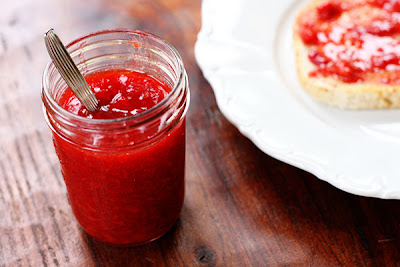
strawberry freezer jam

Fresh, farm-ripe strawberry season is finally in full swing, even for us late-bloomers out here in the dreary Pacific Northwest!


In my house, that means freezer jam.  Lots and lots of freezer jam, storing up the beautiful fresh berry harvest for the rest of the berry-less year.


Now, we definitely eat our fair share of the berries just as they are...  fresh, sweet, juicy, red to the core and bursting with flavor.  Sometimes the whole lot of it gets no farther than our mouths.


But we are so lucky to live close to a beautiful berry farm.  We can pick berries to our hearts content (or buy 1/2 flats picked for us, which happens much more often!) until the season is done.


Strawberries come first, and then raspberries, blueberries and marionberries.  All beautiful.  All perfect.  All my favorites!


There is just nothing more simple and pure to do with berries this perfect than making homemade freezer jam.  You just can't beat it, as long as you have access to really good fresh berries.


(I'm sorry, but store-bought conventional berries just aren't going to give you great freezer jam.  You'll taste what's lacking...  Freezer jam is only as good as the berries that it's made out of!)


Give this a try the next time you get a chance to go berry-picking.  Or knock on my door and I just might be willing to part with a pint or two!

Strawberry Freezer Jam
adapted from Ball
makes 3 pints (or about 6 cups!)

Ingredients:
5 cups smashed strawberries* (from about 1/2 flat or 4 pounds berries)
2 cups sugar
6 tablespoons instant pectin

Directions:
Wash and dry your freezer-safe containers.

*The easiest way to smashed fruit, after you have rinsed, dried and hulled:  Place in a large bowl and gently smash with a potato masher until mostly smashed with lots of small chunks of berries still visible.  Measure out from this bowl...  you will likely have a tiny bit extra.  (Or if you have snacked on the berries a bit, just the perfect amount!)

In a large bowl, whisk together the sugar and instant pectin until combined.  Measure in the 5 cups of berries, stir to combine and then continue stirring for 3 minutes.

Pour the jam into your clean, dry containers, leaving 1/2" of headspace to allow for expansion in the freezer.  Cover and let sit on the counter for 30 minutes or so before transferring to the freezer.

Store in the freezer for up to a year.  Once you open one and put it in the fridge, try to use it up within 3 weeks (like that's ever a problem!).

Enjoy on your toast, crackers, or stirred into your favorite plain yogurt with some granola on top!


6.14.2012

Father's Day 2012 dinner menu

Well, you've probably already guessed that I'm not exactly going all out this year for Father's Day.  I feel horrible (I'll make it up to you someday honey!), but I'm just not up for it.

That does not mean that we won't be feasting and thoroughly enjoying our food though!


Andrew is going to be making his delicious, Easy Homemade Man-Chili for us to reheat in the slow cooker on Sunday, and I will be throwing a bunch of potatoes into the oven to bake and laying out all the fixings!

We will also have a big green salad...  and of course, dessert!


Tres Leches Cake with lots of just-picked farm-fresh strawberries & whipped cream...

and Sour Cream Raisin Pie (my grandma's recipe... coming soon)!

Have you started planning your Father's Day menu yet?   

What are you planning?


6.13.2012

life...

...is a little bit crazy right now.

Things are not going exactly as planned or expected with this pregnancy.

(That's what I get for getting comfortable and thinking I knew what to expect the 3rd time around, right?)

Right now there is not much more to say than that, because we don't know much more than that, but life is a little stressful around here to say the least. 

Just ask Andrew...  I'm pretty sure I haven't cooked him dinner in well over a week (and no, heating up store-bought gyoza last night probably doesn't count!) and he has made two big pots of chili in less than 2 weeks and will be making more for Father's Day!

(Yep.  He's basically cooking his own Father's Day meal.  Granted it will be made ahead of time and reheated - the joys of chili! - but still...  I feel bad.)

I haven't slept much at all the last few weeks.  Combining regular pregnancy-insomnia with a huge dose of the unknown & unexpected makes sleep practically impossible.

Today has more Dr. stuff in store, and loads and loads of laundry that have been ignored for far too long (hoping I don't run out of laundry soap, since I haven't made any in quite a while!).

I guess the point of all this rambling is that there hasn't been much going on in the kitchen lately (except dishes) and I'm not exactly sure when that will pick back up.  Although it won't be too long, since I am having complete kitchen-withdrawals already!

I will definitely be doing some Father's Day desserts...  as soon as I figure out what I want to do and can handle doing in my sleep-deprived state.

All this to say...  Thank you all for being so patient with me!


6.12.2012

easy, homemade man chili

I kind of hate to admit this, but there are just some things that my husband does better than me in the kitchen.

And I have to say it, chili is definitely a win for him!


Maybe it's because he has just eaten a lot more chili in his life, but I can never quite seem to keep mine from being too...  different.

I can't leave well enough alone, and in many cases that's ok, but for a good, classic man-chili, simple is better!

Andrew made a huge pot of this last week and we finished it off in a matter of days.

And last night, we (and by we, I mean my pregnant chili-craving self) decided he should make another big pot!

You could definitely cut this recipe in half if you don't want a large amount, but this is a great dish to feed your freezer with for future meals... so why not get out the big pot and have another meal waiting for you?

Oh, and the spice measurements?  Totally subjective.  We like things spicy around here, so we use quite a bit.  If you're making this for the first time, or you're just not sure, start small and you can always add more later!

Andrew's Easy Homemade Man-Chili Recipe

Ingredients:
2 pounds ground beef
1 large onion, chopped
8 cups (or 4-15oz cans or 2-28oz cans) tomato sauce
8 cups (or 4-15oz cans) beans (we like 2 kidney, 1 pinto and 1 black or garbanzo!)
1/4 cup chili seasoning (your favorite brand, or homemade)
salt & pepper, to taste
chipotle or cayenne pepper, to taste
chopped fresh or canned jalapeño peppers, to taste

Directions:
In a large dutch oven or stockpot, brown the beef: breaking it apart into large chunks and cooking until there is no more pink.  (You don't want to break up the meat into tiny bits, thick chunks the size of your thumb or a bit larger at the smallest!)  As the meat cooks and browns, season it with salt & pepper and about half of the chili seasoning blend.

Here's the trick for the onions:  Add them a little bit at a time, starting with when you brown the meat, and saving a little bit for the very end, so that there are different textures of onions all throughout the chili.  Some bits will be very soft and sweet and others will have a little more bite to them!

(If your meat is on the fattier side, drain off some of the excess fat before continuing.)

Once the meat is cooked through, stir in the rest of the ingredients.  Bring everything to a boil and then cover and simmer on low as long as you'd like!  (Chili only tastes better the longer it simmers, so this is a perfect meal to make a day or two before and reheat in the slow cooker!)

Serve hot with shredded cheese, sour cream and corn chips if you're like me...  or eat it plain if you're a purist like my husband!  :o)

Enjoy!


6.08.2012

rhubarb crumble bars, redone... a bigger batch!

I was supposed to be packing yesterday for this weekend, but I just couldn't get away from this overpowering urge to bake something.

Specifically something rhubarb.


You see, I had made a big batch of rhubarb sauce earlier this week and I didn't want to freeze it...  I wanted to enjoy it now!

These crumble bars are absolutely amazing.  I just can't emphasize that enough.

Even thinking about making them gets me drooling...  and the smell while they are baking?

Heavenly!

So, I did what any sane baker would do...  I ignored the packing, made the boys and I a big batch of popcorn and got to work on these bars!


Give these bars a try next time you want to spoil your family and friends with an amazing rhubarb treat!

Rhubarb Crumble Bars Recipe
adapted from The Pioneer Woman

Ingredients:
3 cups flour
2 cups firmly packed brown sugar
3 cups old-fashioned rolled oats
2 teaspoons baking powder
1 teaspoon salt
1 teaspoon cardamom
1/2 teaspoon nutmeg
2 cups butter, room temperature
2-3 cups rhubarb sauce

Directions:
Preheat the oven to 350ºF. Line a 9x13" baking dish with foil or parchment paper and then butter the foil.

In your mixer bowl, place the first 7 ingredients (everything except for the butter and sauce) and mix until combined. Add in the butter and mix until everything is moist, crumbly and combined.

Dump about two-thirds of the mixture (no need to measure, just guesstimate!) into your prepared pan and press firmly. Spread the rhubarb sauce evenly over the crust.

Take the remaining crust mixture and crumble it evenly over the top.  Press down very gently.

Bake for 60-75 minutes, until the crust is golden brown.  Let the bars cool completely in the pan and then lift out by the foil and cut into bars to serve.

These freeze amazingly, so don't be scared to make this big batch!  :o)  (But if you'd prefer a smaller batch, click here for my original smaller recipe!)


6.07.2012

triple citrus margaritas, from scratch

Two drinks in a row?  Yep.  This is me wishful-thinking and the husband enjoying!

(30 weeks pregnant, I am obviously not drinking these days!)  :o)


For some reason Andrew got it into his head the other day that he wanted to make margaritas from scratch.  No mix, no cheating...  just real juice!

I love it when he gets in those moods and into the kitchen with me.  We have fun together (and annoy each other!) and definitely enjoy the results!!

These margaritas turned out great!  (Well, according to everyone who tried them and my own pre-tequila sips!)

They are just as good with just lemon & lime juice if you don't have or want orange juice, but we loved the combo of all three!

If you've never made simple syrup before, it's an incredibly easy thing to make and great to keep on hand in your fridge.  Perfect for sweetening iced tea, iced coffee, fresh squeezed lemonade and more.

Give these a try next time you are craving a great margarita and just don't feel like driving to the nearest mexican restaurant!  (Where I'm betting you won't get anything close to this good!)


Thanks for joining me in the kitchen honey!

Triple Citrus Margaritas, from scratch Recipe
makes enough for 4-6 servings

Ingredients:
1 cup fresh squeezed lemon juice
1 cup fresh squeezed lime juice
1 cup fresh squeezed orange juice
1 cup simple syrup*
Triple Sec
Tequila

Directions:
*Make the simple syrup (recipe below) and let it cool.

In a pitcher, mix together the lemon, lime and orange juices with the simple syrup (you can start with 1/2 cup and add more to taste if you're not sure how sweet you'd like things!).

For each margarita, fill a large glass with ice.  Pour in a good splash of Triple Sec, a shot or two of tequila and then fill with the margarita mix!

(You can also just mix up one big pitcher, to taste, and serve from there.  Whatever you'd like!)

-----

Simple Syrup Recipe

Ingredients:
1 cup sugar
1 cup water

Directions:
Place the sugar and water in a small saucepan.  Heat over medium heat, stirring occasionally, until the sugar is melted and the syrup is clear.

Remove from the heat and let cool.  Store in a jar the fridge for up to several weeks!


6.06.2012

perfect fresh blended piña coladas

I was having a frustrating day the other day (ok, when is that ever not the case these days?!), and I really needed something special to cheer myself up.

I have always loved a good piña colada...  and I just so happened to have a beautiful pineapple sitting on my counter and some cream of coconut in my fridge that day!

The combination of the fresh, sweet pineapple, creamy coconut, a touch of ice cream and lots of cold ice made this an amazingly refreshing and special treat.


I have to say... I think this may have been the best piña colada I have ever had!

(Of course I was really wishing mine had a little rum in it, but it was pretty amazing even without it, so I'm not complaining!)

Perfect Fresh Blended Piña Coladas Recipe
makes 1-2 servings  :o)

Ingredients:
1/4 of a fresh pineapple, peeled, cored and chunked
1/4 cup cream of coconut
2 scoops vanilla ice cream
2-3 handfuls of ice
2oz light rum or coconut rum (leave this out for virgin drinks!)

Directions:
Blend the pineapple in your blender until smooth.  Add in the rest of the ingredients and blend until smooth.

Taste and add more cream of coconut, ice or rum to your liking.

Enjoy responsibly and pretend it's summer already...  even if you live in the dreary northwest!  ;o)


Related Posts with Thumbnails